Saturday, December 31, 2022

Making a Personalized Card Using Design Space/Cricut

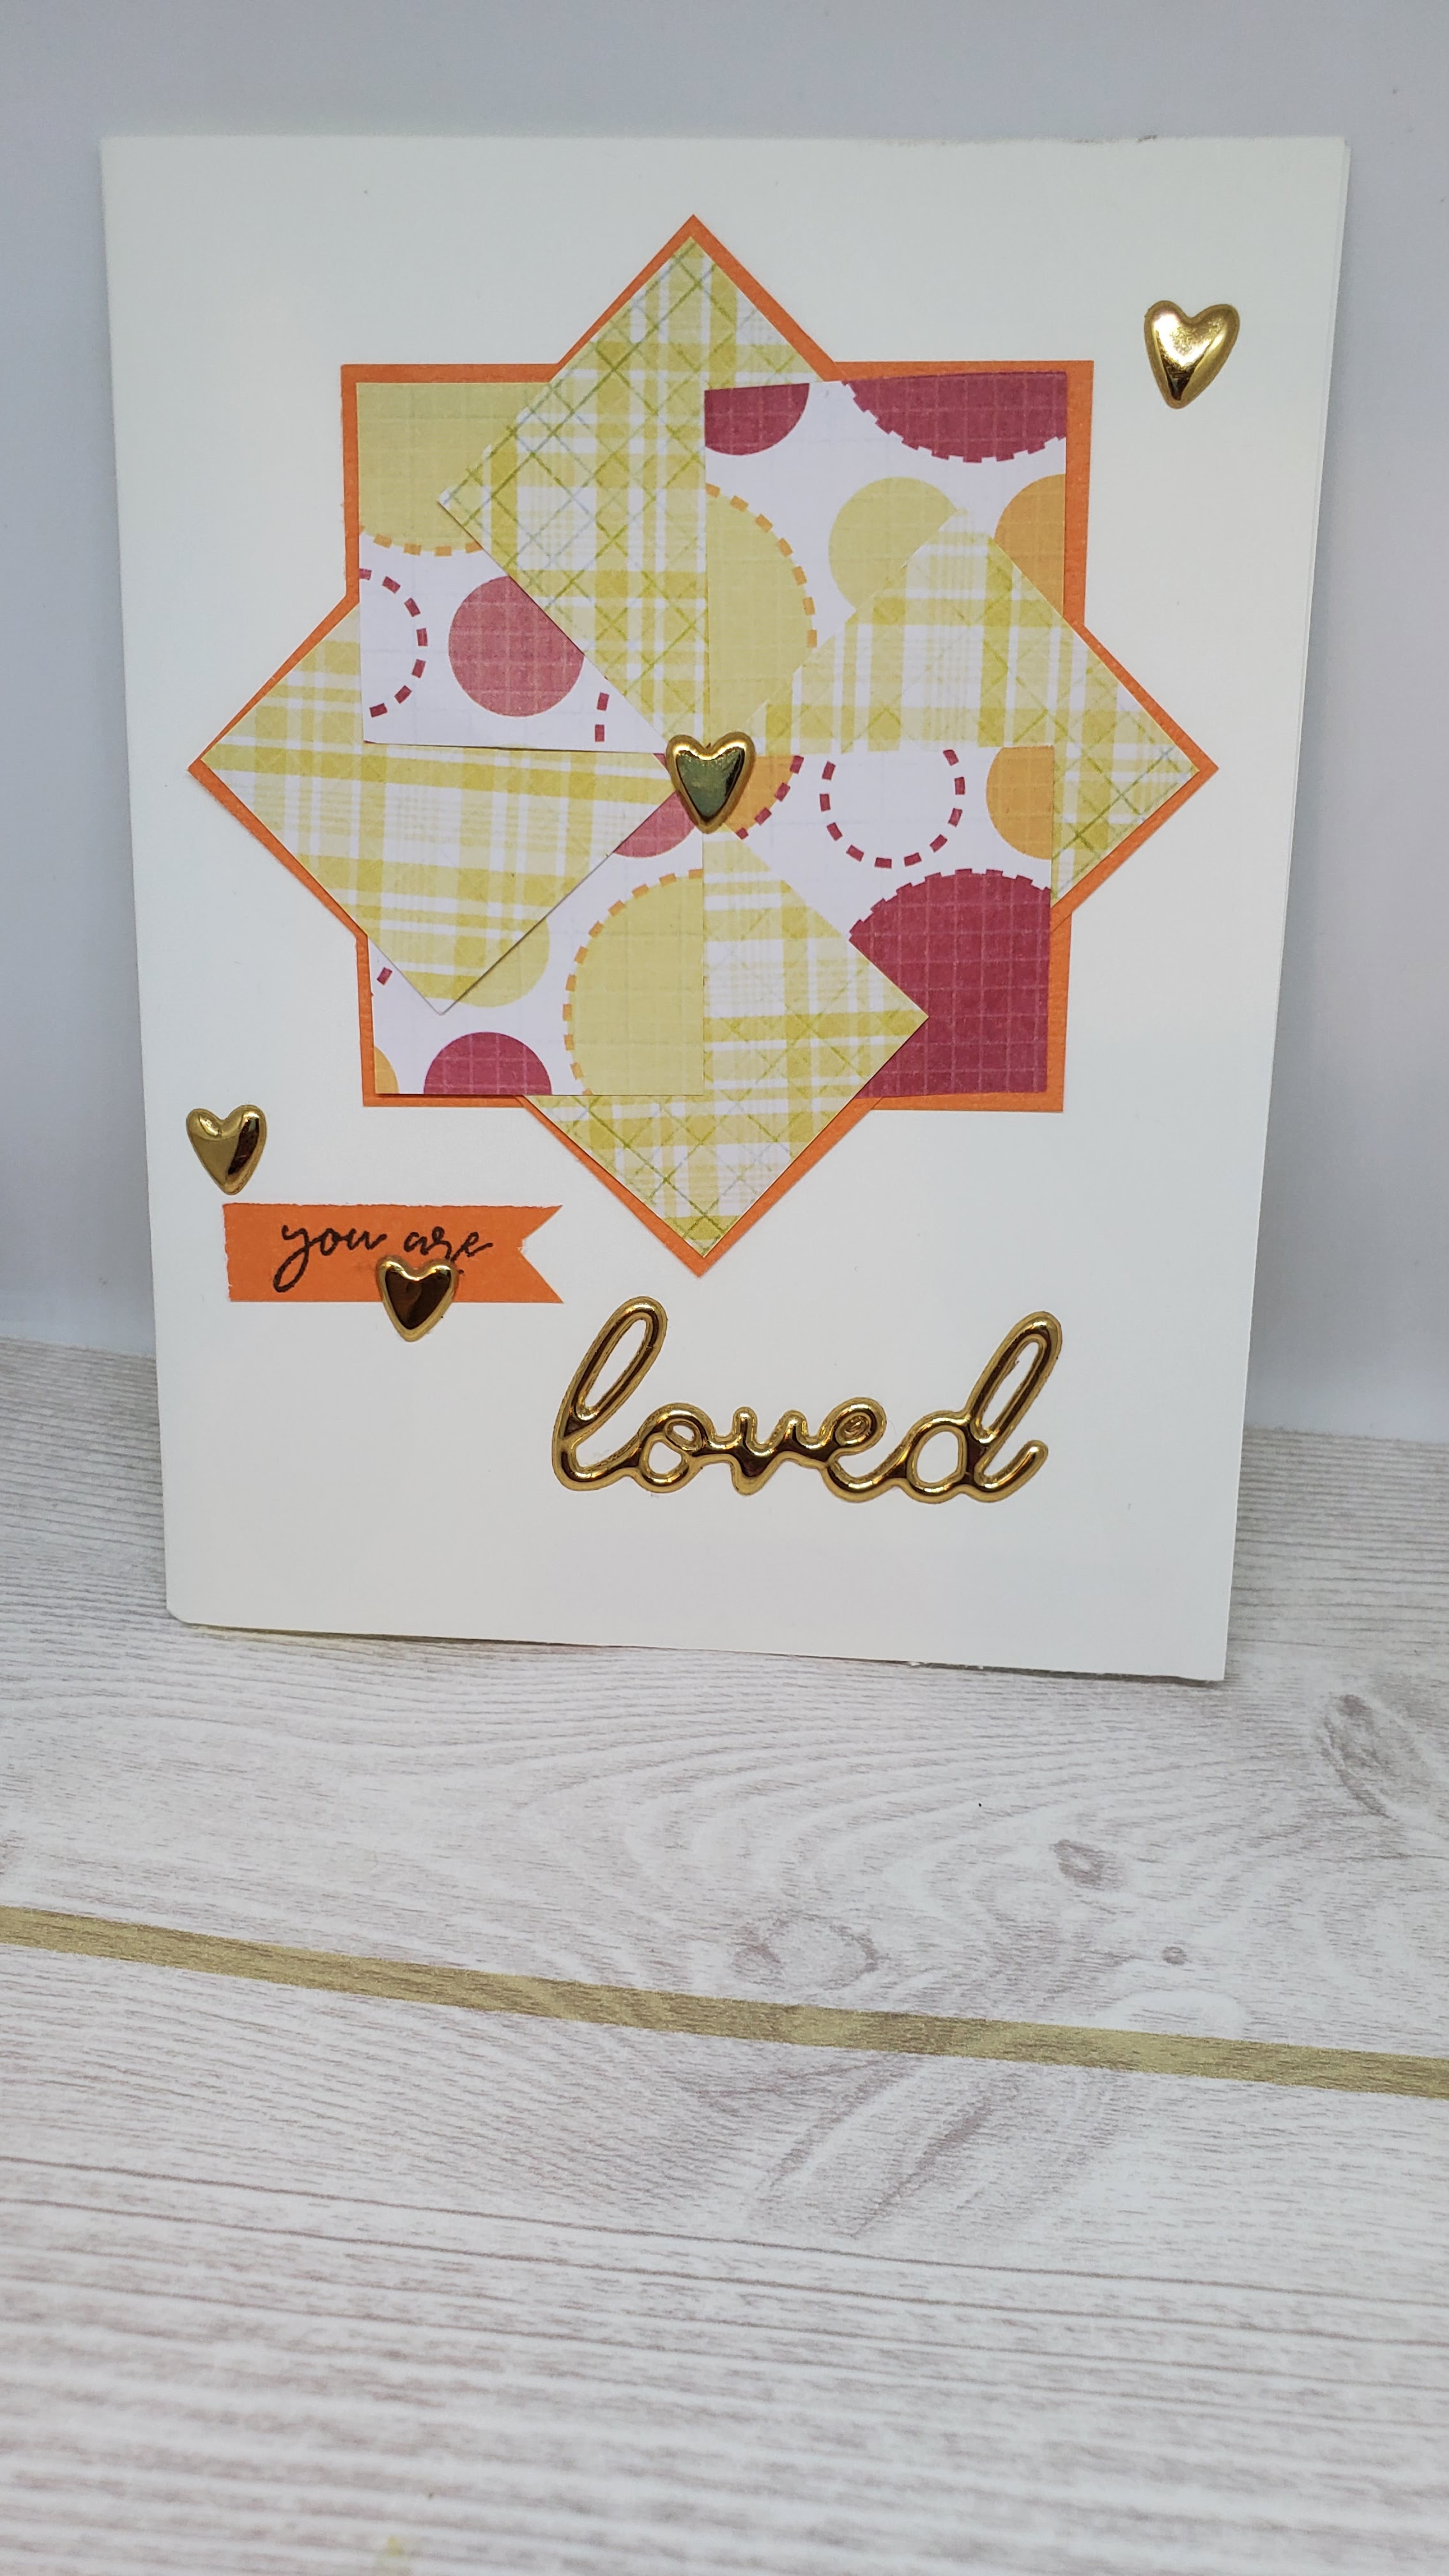
 I made this a few months ago for ItsmePollyB over on TikTok. I am so glad it made her smile. The images were drawn with my Cricut Explore. Images are from Design Space. They were colored with Copic Markers. I love using the edge of my stamping platform to help line up the die cuts, then I used some post-it tape to put those letters just where I wanted them. This is such a good card hack if you want your letters straight. I usually just go with the flow, but I was trying to do my best work for Polly. Hope this inspires you to break out Design Space and make something incredible. The video for this card can be found here.


Thursday, December 29, 2022

Using Cake Decorating Skills on a Card


I am back at it with the texture paste. This is super simple, so everyone can do this. The card ends up looking like I applied icing with edible sprinkles/glitter. Finally, all those baking shows paid off.

To watch the video for this card please head here.


Tuesday, December 27, 2022

December Scraps Card

This time I focused on the scraps of cardstock I have in my stash that are the full length of an A2 card. I layered them up and then created a banner. The end of the banner is made to be a flap over the base. Adding on another element gives you something fresh instead of the typical card opening. I know this is a card I will be making more of. This idea came from this pin on Pinterest: https://www.pinterest.com/pin/311874342955725961/


 To see the card made head on over to my YouTube channel here.

Saturday, December 24, 2022

Washi Wreath Card


 I have a lot of washi, so I am always looking for ways to use it. Here is just one of those ways: make a washi wreath. I did add the washi on to cardstock but you don't have to do that if you don't want to. To see how I put this cute card together see the video here.

Tuesday, December 20, 2022

Simple Masculine Birthday Card


I played around recently with making my own washi. This stripe of glasses, mustaches, and bow ties was just begging me to make it into a card. I kept it simple by adding some texture with a circle die by making an impression instead of a cut. Super simple but now I have a go-to birthday card for the next birthday when I need a masculine card. To see the process for this card and the inside of the card you can see the video here.

Sunday, December 18, 2022

Sunflower Bursting into Butterflies


 I can't remember where I first saw a card like this if it was on Pinterest or maybe Instagram but I knew I wanted to try to recreate it.  Using my Cricut along with Design Space I was able to do that quite easily.  Now mine is a simpler version, however, I like it just the same.  I am entering this into the Anything Goes Challenge #245 over on the Creative Fingers Challenge Blog.  This is an excellent challenge so I decided to share it over there.  You can find the challenge here.  Hope you enjoy this card.  I will be showing the process of this card over on Tik Tok in the coming days so if you want to check it out head on over via my links.  You will see a link to that over to the right of this post where it says link in bio.

Saturday, December 17, 2022

It's a Stitched Christmas


Here's a little peek at all the stitched Christmas Cards I will be sending to families and friends this holiday season. Here is a video version if you want to check it out, here.

Thursday, December 15, 2022

Adding Sequins to Stitched Cards


I recently added beads to a stitched piece for a card, so now it was time to try sequins. A beading needle is a must. Just FYI. I show you how I added the sequins in the video here.

Tuesday, December 13, 2022

Christmas Tree Made with Scrap Paper


 There is still time if you want to make simple, quick Christmas cards like this one. Just need a few scraps of paper and markers. To see the quick one-minute video for this card head here.

Friday, December 9, 2022

12 Tags of Christmas

So for the first time ever, I decided to do 12 Tags of Christmas.  I focused on simple designs, that I thought those who are new to crafting could do with only a few supplies.  I think I did pretty good with that thought in mind.  I leaned heavily on my washi stash ('cause I need to use it up somehow).  There is a video to look at all of these closer that you can find here.  But if you want to see anyone of these being made, head on over to my YouTube channel here to see the 1 minute or less video for each one.  


Wednesday, November 30, 2022

December Design Team Project

 I have seen a few times making Christmas Trees out of folded patterned paper. I finally decided to try this myself. I'm glad I did. I think this is going to be my Christmas Card to send out this year. It is simple, but elegant too. The rose gold star and sentiment added just the right touch. I have a short video reveal of this card you can find here.


Saturday, November 26, 2022

How to turn stitched backgrounds into cards.

 I almost forgot to share this one before the fall season was over. Another stitched card panel was completed. Here is how I made it into a card. Love the alternate color scheme. To see the 1-minute video of this card please click here.


Tuesday, November 22, 2022

Autumn Card Inspiration

 Before I focus on Everything Christmas I had to show a few cards I made and sent out this month. Hope you are inspired...


Tuesday, November 15, 2022


This was something that was inspired from watching countless hours of cake decorators with their mastery of buttercream. I had a revelation when I thought...hey I think that would work with texture paste. It did! I will warn it takes some time for the paste to dry. I would use heavy-weight cardstock as well since the paste has moisture. This also would be a card I would hand deliver for sure. But it turned out just how I imagined it would so that is amazing.

To see how I used the texture paste see the 1 minute video here.

Tuesday, November 8, 2022

Pinwheel Card


This is such a super simple card to make. If you have scraps to bust through try this one. You need two "base squares" that measure 2 5/8" x 2 5/8". Then you need two contrasting patterned papers or solid cardstock if you prefer. These need to be 1 1/4 x 1/14 for a total of 8 squares. Make sure your tape or glue is toward the center. For that last square, you are going to have to sneak behind the first so this makes it easier. Then you can come back to glue down the ends. Put all of this on an A2 card base of 4 1/4 x 5 1/5. Embellish how you wish. So much fun. Want to see a bit more, see the video for this card here.

Saturday, November 5, 2022

Using Cupcake Liners


Seriously using cupcake liners to make a ruffled edge is just so cool. Now I know this is not a full card. While I have been here on assignment for work, I have been making what I call "card panels" that I can later make into cards. Since I brought only a few items with me I purchased a few things from dollar tree to make these out of. The base of the panel is two index cards stuck together by double-sided tape. It has been a fun process. It once again shows me you can make great cards inexpensively. You don't have to have every tool If you are a beginner cardmaker. I suggest a good creative walk in Dollar Tree can lead to cards others will love to receive.

When I finally get around to making the final card. I will add it here as a post for you. Check out my community section for that. I will have it up by Thanksgiving I promise.

Tuesday, November 1, 2022

Slimline Card

It was time for a slimline. I had not made one in a while. Love this image that was sent to me years ago in a swap. It is perfect for this size of card.   
I did super simple Copic coloring.  Added a sticker sentiment and die cuts from a past spellbinders card club kit.

What really made this so cute is I had the perfect color of cardstock to make the slimline card base from.  It matched so well.

Monday, October 31, 2022

Another Pop Up Card- November Design Team Card


 This card design was thanks to #cardsandcraftsyaz over on Instagram. I made a few modifications to her card design but I had such a good time figuring it out so it would turn out the way I wanted in my head. For the Patterened Paper, I used Recollections Honeysuckle. I realized I don't have many "autumn" colored patterned paper. This collection is lovely with its muted tones.

If you want all the measurements here you go: The first pieces of kraft cardstock measured 8 1/2 x 4 inches. This was scored at 1/4, 1 1/4, 3 1/4, and 4 1/4. The second piece of kraft cardstock measures 1 1/2 x 5 3/4, scored at 1/4 and 1 /14. The patterned paper pieces for the matting layers need to be, 1 1/4 x 4, 1 3/4 x 3 3/4, and 2 pieces measuring 3/4 x 3 3/4. Once the pop-up feature is completed you can add it to a 4/ 14 x 5 1/2 inch card base if you wish.

I shared a quick look of the card being made over on YouTube. You can find that video here.


The card is my submission for my Design Team project for Craftyhazelnut's Patterned Paper Challenge. Please check out this challenge and join in this month. You can find out all about it by clicking on the challenge name above.

Saturday, October 29, 2022

Stamped Tissue Paper


For this card, I started by using Distress Oxide Inks to stamp on some flowers and leaves. This does take a while to dry so you have to be patient if you don't have a heat tool to speed up the process. I kept this really simple using a glue stick to tack this down to the card base. Using post-it note tape to keep my letters straight I spelled out Thank in die-cut letters and then added a stamped you underneath. To add a bit of shimmer I used a gold Cricut pen to emphasize any wrinkles in the tissue paper. I love that it added more detail to the card. This just reminded me to think out of the box with just cardstock and patterned paper. So much can be used to make a cute card for a friend.

This one does have a 1 minute video you can check out here.

Tuesday, October 25, 2022

Watercolored Card

Simple watercolored image that I added onto a card front.  I added a couple of scrap patterened paper to just add a bit more color. 

Sunday, October 23, 2022

Dollar Tree Sticker Fun

The main panel I made with just a few stickers from dollar tree. It has been so fun pushing myself to create with just a few tools on hand.  The panel was made using index cards, with a border sticker from Dollar Tree.  Then I had a creme cardstock piece that is 3x2.  I used a couple of copic markers to draw on a frame.  All the stickers were then added from the same sticker set again from Dollar Tree.  The hearts were hand drawn for just a bit more interest.  Once I got the panel home, I added it to a 4 1/4 x 5 1/2 inch card base with a slightly smaller layer of patterned paper.  It is amazing how it all came together using the same color pallete.  Just such fun making these panels then turning them into cards later. 


Saturday, October 22, 2022

Stitched Apple

If you have never completed stitching on a card. I highly suggest it.  So much fun.  Here is a cute apple that I can confirm is not poisonous in case you were wondering.

Using Scraps to make Starburst Card


 This is a great card to make to use up some of those scraps you have. Cut rectangle strips into triangles. For this one, I left space between each of the triangles. You don't have to but I just like that look. I added a bit of texture with an embossing folder. After everything was trimmed down I added the panel on a bit of patterned paper. The sentiment I kept simple. I stamped the sentiment on an oval die cut and placed it at the base of the starburst. This was done in just a few minutes. If you are new to cardmaking, this is a great design to try.


There is a quick video if you would like to check it out here.

Sunday, October 16, 2022

Dollartree Inspiration

Some Spooky panels made I into cards. Thanks Dollartree for all the inspiration. For the top card, I just added some bat washi tape to make it stand out a bit more.  For the one in the middle, I added black cardstock and washi tape to create the corners.  For the last card, I just trimmed the ruffle cupcake wrapper trim so it would fit the panel.

You can get so creative just by using some dollar tree items in your cardmaking.  Great for those who have a limited budget for crafting.

Saturday, October 15, 2022

Negative Die Cuts

 I have to remember to use those negative die cuts. No need to let that goodness go to waste. I was able to use my sentiment from another card on this one today. I also got to use those scraped paint backgrounds I made. It was a double win! Here is hoping you get some crafting time in today.

The video for this card is found here.


Tuesday, October 11, 2022

Washi Witch Hat Card


 I don't about you but I have a lot of washi. So I am always trying to incorporate it into my cards. Today I made my own witch hat by drawing the hat on the piece of cardstock and cutting it out. Then on the card base, I just layered up all my Halloween washi. It lacked some pizazz so to step it up the cutout piece I sent through my die-cut machine with an embossing folder. That added some texture to this simple card. I then added some bling in the embossing design for a bit of sparkle. Hope this inspires you. Yes, there is a video too if you would like to see it here.

Wednesday, October 5, 2022

Spooktakcular Spider Card


I think this can be done by anyone! One cute spider card made with just a few items. A fine-point pen to draw the spider webs and spider legs. A punch or die to cut out a few "spiders" (just circles). Then you have to have some googly eyes to make this super cute. For the sentiment use what you have. I had washi tape that said Happy Halloween so that is what I went with. I could see doing this with kiddos too. Hope you get a chance to play with your stash today!

There of course is a video showing you how to make the card. You can find it here.

Tuesday, October 4, 2022

Sun Ray Card

I loved using this embossing folder to make a 🌞 ray card (that's what I am calling it). It just added that bit of extra texture.   

Friday, September 30, 2022

Spooktacular Pop Up Card- No Dies- October Design Team Project


 Have you ever watched a YouTube tutorial and immediately told yourself, you have to try that? I watched this pop-up tutorial over on Positively Papercraft's channel. I just had to do it. The first thing that came to mind was of course make it Halloween-themed. So, I dug through my stash for Halloween paper. I also found some Halloween dies to make the scene complete. This is just a quick video giving you a closer look at the elements, not me putting it together this time. I literally followed the tutorial. I suggest prior to tackling this watching the tutorial in its entirety. She left in a couple of boo-boos she made. I so appreciate that. That way you can make sure you don't do the same when making the project.

You can see the tutorial I followed to make this here.

This is my design team project for Craftyhazelnut's Patterned Paper Challenge for October. To play along just check it out here.

To see a closer look, check out the video for this project here.

Tuesday, September 27, 2022

Simple Watercolor

Keeping it Simple as usual.  A nice watercolored image. One of my tried and true card designs.  I got this out of my scrap pile.  I added a Doodlebug Design border from way back in the day.  Everything is on Recollections kraft cardstock.   Easy as can be.

Monday, September 26, 2022

Glitter Overlay

Love this birdie a friend from TikTok drew.  I just had to turn it into a card by adding coordinating patterned paper with a glitter laminated overlay.  😍
.

Saturday, September 24, 2022

Card Round Up for Inspiration

Just sharing a few cards that I have completed using up some scraps, die cuts, and ephemera I had ready to use. If you haven't tried that, if you have extras or scraps, take a minute to just put a few pieces together. It is amazing how quickly you can put together a card with things you just may have out on your desk. Hope this inspires you to go play today!