Blog Background

Showing posts with label Distress inking. Show all posts

Saturday, July 15, 2023

Simple Pop Up Feature Anyone Can Do


If you are a beginner cardmaker, this is a simple feature you can add to your card just to make it a bit more special. It’s super simple. I will be replicating this one as there are a few other ideas I want to add like maybe a cake popping up. I don’t know but I know this is easy, fun, and give a surprise to the recipient when they open the card. I hope you will give this one a try.

To see the video of this card beingcreated please head here.

Thank you for stopping by my blog. I hope you find things that inspire you. I love this hobby so much, so I enjoy sharing my cards with all of you. Hope to see you all soon. If you wish to support this channel even more, please see the buy me a coffee link over on the right banner. Have a great day! Happy Crafting!

Saturday, July 8, 2023

Making a Shaped Card Is Something Fun to Try


Not sure this lived up to the Pinterest Card I used for inspiration, but I love trying out new products. This time I was using my new smaller brushes that work well for small stenciled areas. It did what I wanted on this card helping to highlight the embossing, but it did get into the grooves too. That is ok. I did use a few bits from my stash, which turned out great, but I think I went a little overboard.

To see the video of this card being created please head here.

Thank you for stopping by my blog. I hope you find things that inspire you. I love this hobby so much, so I enjoy sharing my cards with all of you. Hope to see you all soon. If you wish to support this channel even more, please see the buy me a coffee link over on the right banner. Have a great day! Happy Crafting!

Tuesday, May 2, 2023

Inspiration Allows Creation With Your Stash

Whenever I peruse Pinterest, I do find great cards that give me inspiration. I mean between card techniques and card sketches it is a field day. But sometimes it is just an image that sparks you, or maybe a color scheme. Today it was the birds I saw on the card, though I knew I did not have any cardinals, I did use birds on today's card. Hope you enjoy it! To see the corresponding video, head here.


Thursday, January 12, 2023

Ink Swiping-Such an Easy Technique all Cardmakers Should Try

If you want fast but stunner cards...I suggest ink swiping. Now, this is a bit longer video...I get it, but I think it is worth it. I loved how each of these three cards turned out. I will be doing many more of these in the future. Thanks for stopping by to check this out. The coordinating video can be found here.


Wednesday, September 21, 2022

Clean and Simple Card

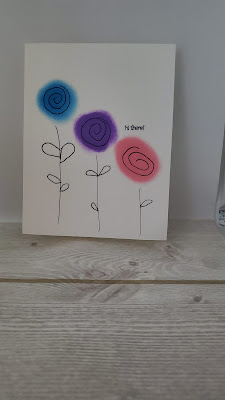
 I used a card sketch to jumpstart this simple card. Distress oxides were applied with sponge daubers to make the flowers. Then just a bit of simple drawing was added. I found a small sentiment that would compliment the card but not overtake it. See you can do this! Hope you will give it a try. Want to see how easy this is to make, head here for the 1 minute video.


Thursday, April 21, 2022

Handmade Postcard


I was excited to make a homemade postcard for a special education High School class in North Carolina. I had a TikTok bestie reach out as this class was trying to see how many postcards they could get from across the country. I mean I had to do it you know? So this had to be all one layer so I stuck to my favorite thing Heat Embossing. I even got brave and used black embossing powder which is notoriously known to give finicky results. My results were finicky too but to offset the imperfections I added a layered stencil. This only took about 20 minutes from start to finish to execute so if you want to give postcards a try, I say do it!

See the video here.

Saturday, April 16, 2022

Faux Dip Dye Watercolor with a Flat Shaker Twist


That title sounds like a drink doesn't it? I thought it was clever...anywhoo, This has been on my I want to try that list since Christmas when I saw Kristina Werner do it. I was really hesitant. I thought it would be difficult to recreate but it wasn't at all. So I challenge all of you to get out of your comfort zone. Try a technique or fun fold you have never tried. It just may become your next favorite thing to do in cardmaking.


I so enjoyed making these cards. The biggest tip is to use that heat tool. It makes this a
much speedier process. Otherwise, you will spend most of your time waiting for your ink to dry.

I have a video up if you want to check out how I made these cards just head here.


Wednesday, February 23, 2022

This Challenge was a Challenge

 I love following challenge blogs and entering when I have a moment.  But this Just Us Girls Color Challenge #620 ended up being harder than I thought it would be.


I knew where I wanted to start I had a teal-ish background I had made on one of my latest TikTok lives.  I thought no problem just add some brown and orange elements you are done. 


Well, I just couldn't seem to get something that I thought would go together.  So I ended up adding a panel I colored with an orange Sharpie, I added a bit of definition with a brown frame on that with a brown Sharpie.  (Talk about getting back to the basics...I know right?)  I still wasn't happy so I ran it through my Big Shot with an embossing folder.  Ok, now I am getting somewhere.  The sentiment I added in StazOn Timber Brown.  I just got this sentiment set from CZ Design called Clean Line Everyday.  It is becoming my favorite quickly.  It just needed a bit more something so I spied these glitzy brads I have had forever so I stuck that on as well.

Is it the best card I have ever made...no.  But I really do like the end result.  Thanks for the stretch Just Us Girls! 


Saturday, October 2, 2021

Distress Oxide Blended Background: 📌 Pinterest Inspired Card

 I was perusing my 📌Pinterest📌 boards for some inspiration. Found a card that was simple with a blended background, so I felt I needed to put my own spin on it. The execution didn't go as planned💁 but it still turned out cute. Just in time for the fall, I hope this inspires you to make and send a card today. Happy Card Making Day! To see the video of this card being made head on over to my YouTube channel here.

Saturday, September 25, 2021

Stacked Stamped Backgrounds


Stacked stamped backgrounds....brought the WOW factor!🤩 Layering text in white embossing ink or versa mark ink followed by another image stamped in dye or distress oxide inks has made me happy and led to SEVERAL cards. If you want to see me put the background and the card together head on over to my YouTube channel (link is here).


Sunday, August 22, 2021

A Struggle

The two challenges I decided to combine, I thought...this should be pretty simple. But as I made my first attempt, I realized for me it was just not working.  I think my first mistake was to try to ink blend the three inks I chose.  I don't know why but when I try to ink blend more than two colors I just really don't like the result.  To make the matters worse the sentiment I chose which was already a pre-made sentiment when I laid it on the card was a different shade of white than the die cuts I had added.  That card got scrapped....


Finally, today after a couple of misses with some coloring on the die cuts I wanted to use things started to come together.  I decided to use distress oxide inks in Fired Brick, Fossilized Amber, and Salty Ocean to color my stacked die cuts.  Salty Ocean was used also to color the sentiment that is stacked on two other white layers of the die-cut. 


To ground the die cuts I used the Fossilized Amber in the corners applying over a stencil.  I also added a sub-sentiment in Salty Ocean.  I feel like this has a Moroccan feel to it.  💕


I am entering this card in two challenges:

Color Throwdown Challenge: #656 found here.

&

Freshly Made Sketches Challenge: #499 found here.


Thursday, January 21, 2021

Another Batch of Letterpress Cards


Letterpress💌...Here is another batch of letterpress cards I made using those oval/circle dies. For those with the impressed imprint, I added flicks of gold metallic watercolor paint. Then to each of them, I added some embellishments/diecuts/sentiments I had already made and had in my stash. The last two cards use the actual die cuts. On both cards, I used two of the die cuts to make the image more "full". I then added some simple Prima flowers from my stash. I have had those beauties in my stash for more years than I could count. I also on the last card added a simple double bow of silver metallic thread held down by my favorite glue...Elmer's Craft Bond.


Tuesday, January 19, 2021

Letter Press: First Set of Cards


Letterpress💌...I made several simple (ie. focal image, sentiment, embellishments) cards that I wanted to share from my letter pressing fun. Today I wanted to share with you all the cards I
made with my feather die. Notice that on some of the pressed pieces there is a bit of a halo around the image. I think that is because I wet the image a little too much maybe. Each card is pretty simple, but that is what I love about the cards I made. The embellishments came from my stash, some are from dollar tree (the glittered "epoxy" stickers) while others were other images I die cut from the leftover paper I had blended with the distress inks. The sentiments came from The Paper Studio Celebrate Life Sticker Pack. I put these all together pretty quickly. They will make great encouragement cards.


Monday, January 18, 2021

Trying Letterpress

 Letterpress 💌. . . Thanks to @jennifermcguireink I have been wanting to try forever! So I believe I started this project in November. However, thanks to the surge of COVID in SoCal, I have been too busy and stressed to put these into cards...until about two weeks ago. So I am ready to share with you the cards I made from these beauties. I started with Distress Inks blended onto watercolor paper. I then cut out feathers and these round circles. I then wet each one and pressed them onto cardstock measuring 4 1/4 x 5 1/2. I will show these in batches over the next few days. But first wanted to just show you how pretty the die cuts were after being pressed into the cardstock. Hope you enjoy.


Sunday, March 19, 2017

St. Patrick's Day Tag Swap

Remember that St. Patrick's Day tag I tore?  I finally get to show you the end result.  Yep, a bit late, but still hopefully worth the stop by.

Here are the tags I sent for my St. Patrick's Day Tag swap.  My partner has received them safe and sound so I can share.

You can see the three tags above. All the cut out images that are print and cut were from Lori Whitlock( the horseshoe, pot of gold and the hat) or Miss Kate's Cuttables (the owl).  The shamrocks, the doily, and the shape with the sentiment on it came straight from Cricut Design Space (part of my subscription).  

So this is the tag I tore.  I cut out the tag and patterned paper to go on top from Cricut design space.  I layered the pieces. I added a border punch along the bottom 3rd of the tag.  Added my print and cuts.  I also stamped the arrow and the sentiment in Momento Tuxedo Black ink.  The sentiment came from a set I bought from Unity Stamps.  The arrow was part of a travel set of stamps my sister gave me but I do not know the company.  I then added some hole reinforcers, a large eyelet, and threaded my ribbon through from my stash.  (This is where I tore it and you already know how I fixed it.  If you missed that post you can find it here.)  I did add some clear wink of stella to the horseshoe, gold coins, and the shamrocks to add some glimmer.

This tag I had a blast with.  I got to use some of my favorite toys.  Distress inks and a stencil.  So the stencil here is from Heidi Swapp.  I decided to go with a rainbow look.  I started with broken china, then mustard seed, and finally pickled raspberry.  I just lightly put down some color, then taped on my stencil, adding on more color.  I loved the rainbow look of it.  I then added some glimmer mist to the whole tag.  Who doesn't want shimmer?  I added the cute print and cut owl adding wink of stella to his hat, bow tie, and balloon.  I then added a stamped image of what kind of reminded me of clover to the edges in Lost Lagoon ink.  The sentiment is one of many I created using my computer on wonderful Cricut sticker paper. Again I must tell you how much I love that sticker paper.  It is wonderful.  Hole reinforcers were next with a large silver eyelet.  I added in some twine I got at Christmas from the Target dollar spot. 

Ok, I kept it simple for the last tag.  I know I wanted some type of Irish blessing on the tag because it just seemed like the right thing to add.  I found this sentiment thanks to Pinterest.  I added it to a cut out shape using my Cricut by letting the machine write it all out.  On the tag I added some green glitter tape, a doily cut out and some shamrocks.  I added some bakers  twine along with some more of the green twine...then called it quits.

Now if you have never done a swap.  You typically then also send some extra goodies.  If you want to see what else I sent, you can find it here in my You Tube video.


I am adding these tags to Digi Choosday Crafting Challenge #11-Anything Goes.  Check this challenge out here.