Blog Background

Showing posts with label digital stamps. Show all posts

Saturday, May 20, 2023

Using Some Digital Patterned Paper


Digital paper is a great way to really add different looks to your projects without spending a lot of money. I love digital paper, digital stamps, etc when creating. You don’t have to use the die cutting machines like Cricut, either. If you have Word, a printer, and some dies, then you have more than enough to get started using digital mediums you print on paper in your papercrafting. For today’s greeting card, I used a Pinterest Pin to inspire me. I broke out that music digital paper I just downloaded into Word the printed it out. Then I made these cute cards using minimal supplies. I hope you will try this card making idea next time you get a chance to play with your stash. Thank you for stopping by my channel. I hope you find things that inspire you. I love this hobby so much, so I enjoy sharing my cards with all of you. Hope to see you all soon. Be sure to check out the video for this card here. If you wish to support this channel even more, please see the buy me a coffee link on the right side bar. Have a great day! Happy Crafting!

Saturday, September 24, 2022

Card Round Up for Inspiration

Just sharing a few cards that I have completed using up some scraps, die cuts, and ephemera I had ready to use. If you haven't tried that, if you have extras or scraps, take a minute to just put a few pieces together. It is amazing how quickly you can put together a card with things you just may have out on your desk. Hope this inspires you to go play today!


Saturday, January 2, 2021

Top Nine on Instagram


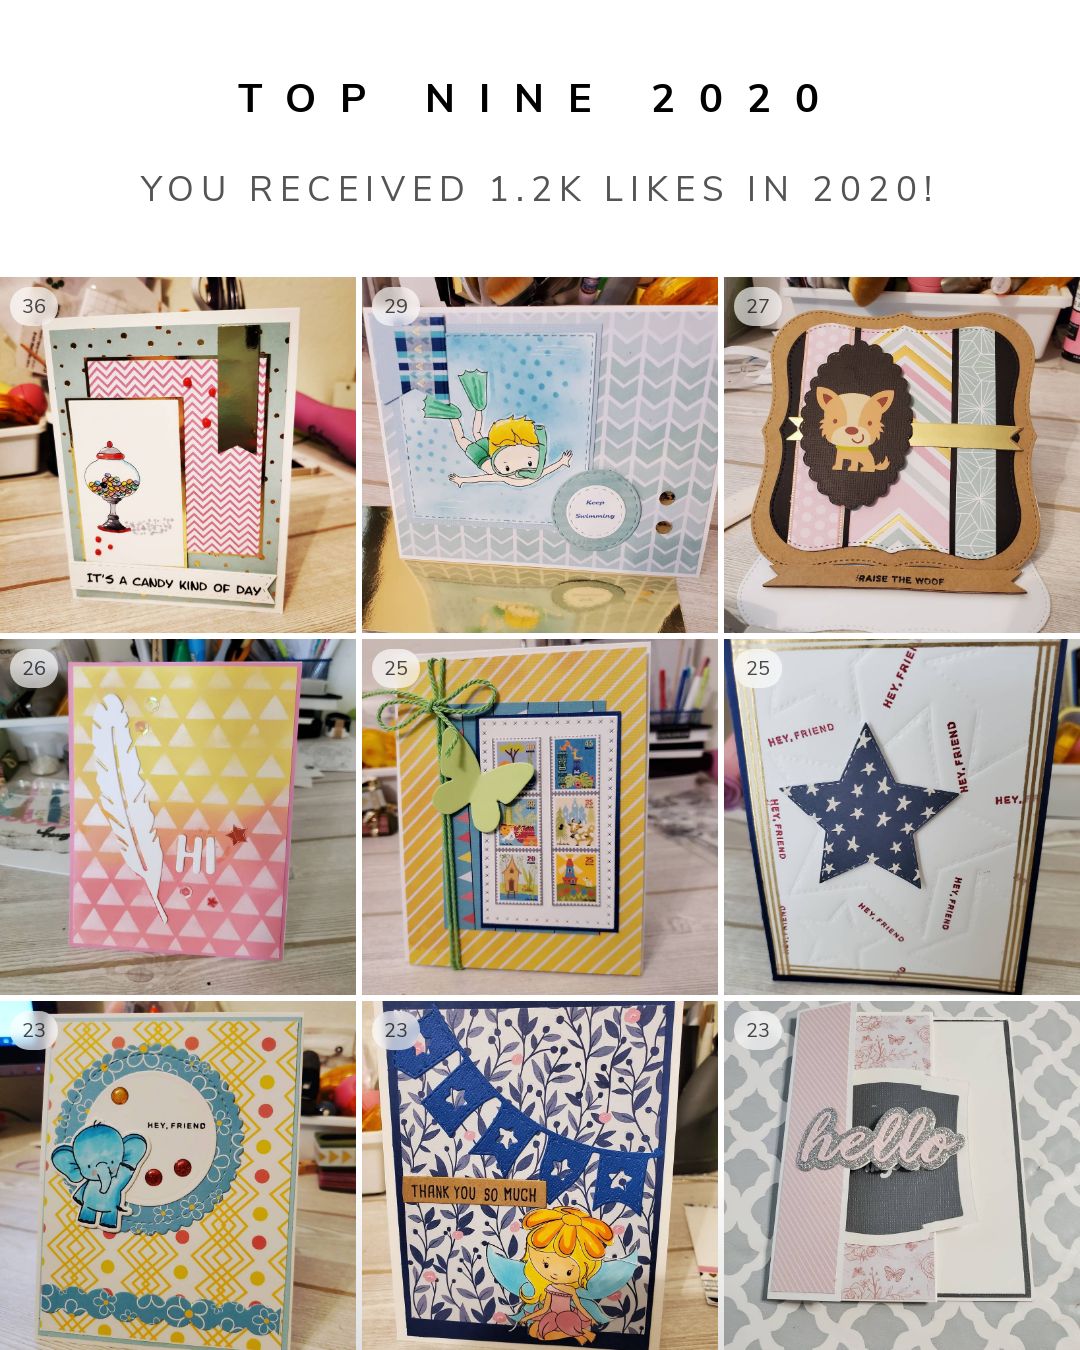
 Above are the top 9 cards with the most likes on my Instagram account for 2020.  Thought I would include them here too in case you didn't get a chance to check them out.

Thursday, November 26, 2020


 Here are my last *Fall* cards for the season. I am bringing you both of these for a couple of reasons. 1. The images were on my desk therefore, I felt I just had to use them to make a couple of cards. 2. It's Thanksgiving. This is my way of wishing you all who support my Instagram, Facebook, YouTube, and blog a wonderful Thanksgiving. I am thankful for you all. I am hoping to grow my social media "fam" over the next year. I am so grateful to have you all along for the ride. Each like, comment, and view makes me smile. All Digital Stamps used by Prettgrafik Designs. Images cut with my Cricut Explore. The sentiment on the thankful card from Cricut Design Space.

Sunday, August 26, 2018

Stitched cards, other projects, etc.

Hello my fellow crafters.  Life has been busy.  As you may have noticed I haven't been posting much.  Between, school, work, and family I have not had time to shoot videos or post.  That doesn't mean I haven't been creating though.  I wanted to to stop by and show you some of the cards I have been making.  I hope you enjoy.  When I am busy like this I do have more time to get things loaded to instagram so you can always find me there or my Facebook page.  I will leave the links down below.

Pinterest: Samanthadesigns Facebook Page: @SamanthadesignsPapercrafts Twitter: @Samanthadesign2 Instagram: @Samanthadesigns2

Saturday, November 11, 2017

Keurig Boxes

 I wanted to stop by with a couple of projects I did sometime back.  This is not an affiliate post.  The cut files come from Lori Whitlock.  I just love her files so wanted to share with you!  These boxes hold 2 Keurig cups of your choice.

I love them since they are quick to put together.  They make a nice thinking of you or thank you for someone who has made your day.  This also could be quickly made into a Christmas stocking stuffer by just changing up the papers.  On this one I added a cute Bugaboo digital stamp that I did some Copic coloring on.

This is a great project to use some that 12 x 12 paper you are hoarding...and I know you have some begging to be made into these cute boxes.

Here is another box I made.  This time I used a simple sticker I picked up at Dollar Tree to put on the belly band.  So cute!


I hope you enjoyed getting to see these.  I also hope you get to play with some paper, inks, die cutting machines, whatever brings you joy today!

I am entering the first box above into the following challenges:

Not Just Cards Challenge:  November Anything Goes Challenge found here.

Digi Choosday Crafting Challenge:  Week 45 Anything Goes found here.  

Saturday, September 23, 2017

Happy Fall Ya'll

So with the beginning of fall, I am leaning towards doing some fall cards, Halloween cards, with still a few other everyday cards thrown in here and there.  This little beauty is my first double z card.  It turned out so pretty!  Some of my best copic coloring to date on the jar digital stamp.

I started with 110lb recollections cardstock in white.  The card when closed measures 4 1/4 by 4 1/4.  Still not sure how I ended up with that strange size card.  (Definitely going to need to make the envelope to go with this odd size😜.)

The image on the tag is from Bugaboo Stamps.  I love their digital images.  This is colored using Copic markers.  I then used some stitched dies to cut out the image and the craft tag behind it.

From my paper scrap stash I gathered all the rest of the cardstock I wanted.  Choosing oranges, blues, and browns.  Every piece of cardstock and patterned paper was distressed using Gathered Twig Distress ink.

The flowers and leaves are die cut from scrap paper as well.  The lighter green leaves I laid down a bit more dark color on so the contrast was more pleasing to the eye by using Momento's Bamboo Leaves.

The sentiment I stamped in Momento's Texedo black ink.  This sentiment is from Unity Stamp Co.  The frame around and the die I cut out the sentiment with comes from Papertrey ink.  I did this on some Recollections white cardstock but it was too bright, so I used the Gathered Twig Distress in again to add some color.

I added flat back pearls in a gold color to the flowers and two white pearls next to the sentiment.

I am entering this card in the following challenges:

Your Next Stamp's Sketch and Color Challenge:  #73 (used craft, brown, orange, soft yellow)  found here.

Creative Fingers Challenge #137:  Anything Goes found here.

 Creative Inspirations Challenge #280: Seasonal found here.

Sunday, August 6, 2017

Shopping my stash Ep. 5

I still have a couple of cards to show you from the last time I got out my pre- cut dies out  to make cards.  

There is such satisfaction in knowing you are using all those shapes that were cut using your dies or die cutting machine.  In that same stash I also have colored images as well.  This makes putting a card together pretty quick.

Here is a card from that I put together with my son in mind.  He loves legos.  He also is a fan of ninja's who carry swords.  He has a sword collection of his own and at times gets them out to do some pretend fighting of the bad guys.

So I started out with a 5 x 7 card base from Recollections.  The "badge" die was already cut out from a previous project and in my stash.  I am sure it was one of those times I cut something out way too big.  As you can tell, this takes up much of the card.  I also had the green polka dot paper in my stash.  

The image I am not sure where it is from but I had already colored it in.  It still felt that it needed something, so I used a white cut out of the star and colored it the same color using my copic markers.

The "my hero" sentiment I made using by printer and Cricut sticker paper.  I also added some green glitter epoxy stickers from dollar tree.

Now from this who collection of cards, of which I have 2 left to share, I asked my son to pick out his favorite.  I was shocked when it wasn't this one!

I am entering this card into the following challenges:
Digi Choosday Crafting Challenge #31 Anything goes found here.

Creative Fingers Challenge Blog #135 Anything goes found here.


Saturday, June 3, 2017

Shopping the Stash-EP 2

Bear with me guys...I luckily have made few cards all in that one sitting to share with you because I will not be doing any crafting for a bit.  I am moving.  Now don't get excited, it is just a town over.  I will be gaining a bit more space (still an apartment though), a little less in rent, and hopefully a bit more quiet.

While I do that however, I have to start packing all my crafty goodies...then get them set back up.  So not sure how long that will take or how often I will be posting over the next few weeks.  But until then...here is another card.

This was totally simple...easy to do, and would be great for a beginner.

The ombre card was one from the pack I got not long ago in yellow.  The image I printed out on white cardstock using my printer.  Not sure where I got the image, but if I can find the source, I will add it here.

I cut the image down a bit and colored the bee with some yellow ink.  Behind the image I added a short scalloped border in black.  On the right I added an orange page holder.  I have this die as part of a set made for all those planners we all love.

Seconds to put together but so cute in person.  The final touch was the heart sticker I added to the bee's trail.

I am entering this card into the following challenges:

Brown Sugar Challenge #253 Celebrations.  You can find this challenge here.

Lemon Shortbread Challenge #42 Anything Goes.  You can find this challenge here.

Sunday, May 28, 2017

Shop Your Stash-Episode 1

So, if you are reading this, I am currently on vacation.  I am finally feeling better after a bout of some type of respiratory infection just in time for some time off.  ðŸ˜Š

When I started feeling a bit better, I did get some time to just play around with all those products I buy for my papercrafting stash.  I really didn't have the energy to work on anything new, but instead pulled out all my die cuts, scraps, things I have received in swaps.  I brought those together to pull together some cards.  So for a while I will be sharing these cards with you.

I still tend to cut out lots of things with my Cricut then go back to that stash of cutouts from time to time to do this process of putting together cards using those.  I have a video of what that looks like here, if you are interested.

Ok, on to today's card...

This card was simple.  On another stint of putting things together i had already put everything on this card and left the black oval in the middle which was begging for a cute image.

So the polkadot red triangle, the banner, the flower...everything was there except, the image of this precious girl, the small flower at the bottom and the sentiment.  This came together in seconds, as I had the little girl already colored.  She just went with this...you know?

The image is from freedeariedollsdigistamps.blogspot.com.  This lady has an amazing talent.  She shares all the digital stamps she makes for free.  You need to check her out if you have never seen her images.

The image was colored with Copic markers.  The sentiment is one of my sentiment stickers I made.  

I think this is such a cute card.  I have such a good feeling when I go use all that "stuff" I have.

Not sure who this card will go to.  My stash is getting a bit full so I may be downsizing some of them as a RAK or swap, I am not sure.

What cool things are you making?  I would love to see so feel free to add in the comments below or upload to my facebook page, which you can find here.

I am entering this into the following challenges:
Creative Fingers Challenge Blog: #131 Anything Goes found here.

Digi Choosday Crafting Challenge:  Week 21 Anything Goes found here.

Tuesday, May 16, 2017

Listen to the Music in your Heart

Here is a sweet hula girl I added to the tag from a few posts ago.  You can find that post all about washi here.

The hula girl is from Prettygrafikdesign.  You can find the image here.  I colored here in Copics and she has been happily waiting in my bin of die cuts waiting.

Since I already had the tag started this was easy to put together.  I added her to the tag, put a doily behind her, added some enamel dots, a pink glittered chipboard flower with an added bling center, then cut out one of my sentiments I made with Cricut sticker paper.

Another card ready to give out to encourage someone.

I am entering this card into the following challenges:
Creative Craft Cottage Challenge: #87 Three of a kind (Three enamel dots) You can find the challenge Here.

Lemon Shortbread Challenge #41 Anything goes found here.

Crafting with an Attitude Challenge # 27 Anything goes found here.

Sunday, May 14, 2017

Cowgirls Rule...& Blog Giveaway

A card that took literally weeks to make is finally born.  ðŸ˜Š Stay to the end of the post to here more about the giveaway.

Today's card is one that has been put together in stages.  The image is from artbymiran on etsy.  You can find her here.  The cowgirl was colored with copics weeks ago.  She has been sitting in my cut out container just waiting to be added to a card.

I knew I wanted to have a wood grain background for the card.  I don't own a wood grain stamp nor an embossing folder that does this.  So what to do?  MayMayMade it to the rescue.  I watched this video that teaches you three different techniques to make a woodgrain background.  You can watch it here.  This was exactly what I was looking for.  So maybe a couple of weeks ago I made the background piece using peacock feathers distress ink.  My "planks" aren't very straight but I love the effect.  It was super easy.  

Then last weekend I took that background and die cut it using my memory box cross stitched rectangle dies.  I also die cut the two banner pieces out of Recollections paper using a Papertrey Ink die.

Finally yesterday, I put it all together with another scrap of cardstock I had.  I added the sentiment from my word stickers I made.

You can see a close up of those stickers by reading my blogpost here.  This is a word document I made for my use and am happy to share.  I just printed these out on cricut sticker paper and cut out when I need one.

I am entering this card in the following challenges:

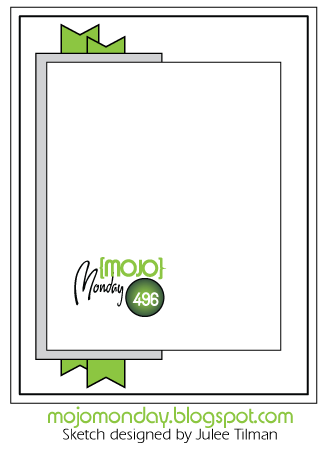
Mojo Monday Sketch Challenge #496 found here.
Creative Fingers Challenge: #130 Anything Goes found here.
Digi Choosday Crafting Challenge:  Week # 19 Anything Goes Found here.

****Giveaway****
Go to my blogpost here to see more about the giveaway that will be drawn June 2, 2017.

Saturday, April 29, 2017

Let's Roast Marshmallows

Today was a pretty successful crafting day.  I hope you will take time to see my other posts from today in order to take in the other crafty goodness that I created today.  But here I am spotlighting a cute card I put together using a digital stamps, background paper, and clip art from Prettygrafikdesign.  I found this store on etsy.  From that shop I bought background papers, the camping girl, and the fire.  The compass that is layered on the checked blue background came from Cricut Design Space.  I used the print and cut feature to make all these elements.

I first took the dark background paper which has fireflies all over it and added glimmer mist.  It was just crying out for some sparkle.  I then used a cross stitched die to cut it down to size.  I used the same die set to die cut the next layer.  These are memory box dies I believe.

The marshmallow roaster (girl) was colored in with copic markers. The only thing I added to the fire was some Wink of Stella.  Again...more sparkle was needed.  

Behind all the layers you can see a peek of washi tape that I picked up from the Dollar Tree.  That pink plaid has come in handy a few times.

I added all the layers to white cardstock cut at 4 x 5 1/4.  I then added that to a kraft card base that measures 4 1/4 x 5 1/2.  The girl and fire I did pop up with foam squares..which got interesting to do when it came to the marshmallow section.

I did not add a sentiment to this card.  I also can't think of one to add inside the card.  Got any ideas?  Let me know.

This card was inspired by Mojo Monday's Challenge sketch for this week:

I am entering this card into the following challenges:

Mojo Monday Sketch Challenge # 494 found here.

Creative Fingers Challenge Blog # 129 found here.

Finally, Week 17 Digi Chooseday Crafting Challenge:  Anything Goes found here.


Saturday at Sundown

Here is a video with what I accomplished today.   I will post separately a closer look at the two cards I completed.  I will also come back and do a follow up regarding the gift boxes I made.  I plan on using them for a special gift for a co-worker.  I will get that up as soon as I get the gifts inside the boxes.

I also got a bunch of scrap paper cut up in "my" go to sizes.  See below how I store this paper.  I cut down all scraps in to the following 4 1/4 x 5 1/2, 5 1/2 x 2 1/2, 5 1/2 x 1 1/2, 3 x 2, 3 1/2 x 2 1/2, or 3 x3.  I used to horde everything but not anymore.  I go into this box for layers, accent papers, etc.  I love doing this.  It saves me time later. 


Sunday, April 16, 2017

Slow Crafting Weekend

This weekend...I stayed on slow mode.  But don't worry I still got one card made.
I made a cute little slider card.  I used a digital stamp from tiddlyinks colored with copics.  I added a red striped mat using some BoBunny Beach Therapy paper with some leaves I die cut from green scrap cardstock.  I added some flowers and silver Nuvo drops to the center.

The main part of the card is made with Recollections Khacki cardstock.  I used a Bobunny die in the middle to make the "lacy" looking window.  Unfortunately,  even with a shim I could not get the entire die to cut through.  So the middle does have some pieces still intact.

The slider inside has some flowers stamped on the side so it will peek through the die.  It is a Unity stamp, stamped in Stampin' Up's Rose Red ink.  The sentiment is from an unknown source...another one of the "girl" quotes my sister give me.  I added a tab at the top by punching a circle and folding it in half.  I added some more flowers and Nuvo drops.

I did make a mistake on the back of the card.  I somehow got some cocunt oil on it from my hands, but I am adding some more of that stripped paper on the back which will cover it.  So that should take care of that oops.

I am entering this card into the following challenges:
Fussy and Fancy Friday Challenge Blog: #185 Fancy Folds or Shaped Cards found here.
Digi Choosday Crafting Challenge:  Week 15 ATG found here.

Friday, March 3, 2017

A Bit of Coloring.....

I rarely get any time during the week to make cards or anything.  Last night was an exception.  I really felt like doing something creative but not drag lots of supplies out.

I remembered I had some images I had cut out a few weeks ago using my Cricut or my stitched dies.  So I sifted through them and found these three cuties.  They were begging to be colored.

The girl with the heart balloon is from freedeariedollsdigistamps.blogspot.com.  She has the cutest images.  

The two other images are from: www.tiddlyinks.com. I just purchased these recently so this is the first time I have colored the cheerleader and the girl reading the book.

 I got out my Copics and went to work.  I will never be a "Copic" master, but I keep trying to get a bit better all the time.

Now I have some cute images ready for cards. 

I was watching Jennifer McGuire's You Tube channel.  She mentioned that the Daily Marker is doing a 30 day coloring challenge.  I thought that would be something awesome to do.  Not sure I would ever color everyday for 30 days, but  I could commit to coloring at least once a week.  So maybe I will start a weekly coloring challenge....Hmm something to think about.  

If you want to see more about the 30 Day Coloring Challenge, you can check it out here.

Sunday, February 12, 2017

That's a horrible idea. What time?

I am not known for my Copic coloring...but I still try.  Today's card includes some of my Copic Coloring.

I started with a 4 1/4x 5 1/2 top folding cardstock in Black.  I then colored my cute image from Bugaboo Stamps. I also added a cute lantern to image from the Cricut Design Space.  I added my clear wink of stella to her purse, shoes, drink, and the lantern to add some sparkle.  You really can't see that in a picture but it is beautiful in real life.

I layered the image on red cardstock.  All of the cardstock is Recollections.  I then printed out the sentiment on my computer and cut it out.  I found the quote on Pinterest.
Doesn't she look like she is up for anything? 

As an added touch I added some cording in black and gold that I got from the Target Dollar spot at Halloween.  This is such a cute card.  I am pleased with my coloring.  This is one of those cards I just knew was going to be cute when I started.

The sketch for this card came from CAS(E) this Sketch's # 208.  You can find the link here.  Here is the sketch:
I am adding this card to the following challenges:
CAS(E) this Sketch #208

Creative Fingers Challenge #124:Anything Goes

Creative Craft Cottage #81: Anything Goes

Sunday, November 27, 2016

Oh What Fun

It was time to bring out the digital stamps and some goodies to make a nice Winter themed card.


So I looked through my digital stamps till I found this cutie. The image I purchased from Etsy from Prettygrafikdesign.  I think this little girls looks like she is having the best time.  I used Design Space to add her to this cool tag then colored her in using my Copic markers.  I get a bit lost on shading but I try to do some here and there.  I also still color outside the lines...it is a skill I have yet to master since kindergarten. 

 I used some different inks with a circle mask to make the circle background.  The color combo for this was Bermuda Bay by Stampin' Up, Tumbled Glass, and Peacock Feathers from Tim Holtz' Distress Ink line.  I just sponged those colors in to make the circle to help draw the eye to the cute girl sledding. 

The banner with the sentiment I made again in Design Space and the snowflake came from there as well.  I popped everything up on some foam tape.  I added some gems, ribbon, and twine....ta..da...total cuteness!

I am entering this card into:  Inspiration Destination's Anything Goes #113
Crafty Catz Challenge #348 Anything Goes with Optional Twist which is Christmas Tags

Sunday, July 24, 2016

Back to the Fun!

My work life has been challenging the last year.  That didn't leave much time for blogging, but it doesn't mean my love for papercrafts has diminished.  I still have been creating regularly since our last meeting.

Lately it has been fun playing around with mini-pocket letters and embellishments.  Here are a few that I will be sending out in the mail to swap partners.  Though these are only sneak peeks.  I will post everything in it's entirety once I am sure the partner has received it.  

Here is a sneak peek of my Summer Themed mini PL that will be going out to my partner with a few extras. This was a blast to make. To be in the mail by Monday.


Sneak peek of my camping mini PL and a bag of goodies. Going to be heading in the mail Monday.
Lastly is the sneak peek of my mini embellies I am swapping with their bag of extra goodies. Yesterday was very productive. I gave my circuit explore a workout. ðŸ˜Š

Sunday, July 12, 2015

Late night Mojo....

I want to start this post off by saying...I am not in love with this card.  I am also late getting it posted so it won't make this weeks Mojo Monday #405 Contest.

My son has developed a love for computer games so now it is a challenge to get the time to post when he isn't on the computer.  All the other times, I am busy doing other things.  I think I will have to begin doing the majority of the my posts from my nook.  We'll see...but back to the card.

I struggled with this weeks sketch.  The diagonal element I wasn't in love with and did not know what to do with.

Anywhoo, I began with a digital stamp by Bugaboo Stamps.  I used the print and cut feature on my Cricut to cut out this cute bear in a square image.  I colored it using Sharpie markers.  I really had a difficult time with the coloring as well.  I don't have any light brown or flesh colored Sharpie markers, so I made the bear two toned in grey and brown.

The base card is 5 1/2 x 4  1/4 in kraft.  The polka-dot paper is by Graphic 45's Time to Flourish 6 x 6 paper pack.  I backed it with some light blue cardstock and then added some glitter paper in silver to the bottom.  All the other paper in this project is by Recollections.

I added a row of buttons in Navy by Recollections).  Told ya I didn't know what I wanted to do with the diagonal element.  

I then popped up the digital stamp with foam mounting squares.  This stamp did not really go with the glitter paper and looks weird where it is placed.  Not sure what I will end up doing with this card, but I may want to try it again another time with some different pieces.

Tell me what you would do different?

I also realize I need to invest in Copics, I just haven't yet.  Any suggestions on where to begin with them?  Did you buy three in a color family each week or what?